Introduction
In this article, we'll secure a Single-Page Application (SPA) built with React (using Vite) and a backend powered by Spring Boot 3.2 with Spring Security 6. We'll be using OAuth2, Proof of Key Code Exchange (PKCE), and JSON Web Tokens (JWT) with Role-Based Access Control (RBAC). This setup provides security, user authentication, and authorization.
OAuth2 provides a secure and standardized way to authorize and authenticate users. At the same time, PKCE increases security by preventing authorization code interception attacks.
JWTs are used to securely transmit information between the client and server, and they play a crucial role in verifying the user's identity and permissions.
Implementing RBAC within this framework allows you to manage user access based on roles, ensuring that users only have access to the resources they are authorized to use. So, with that, let's get started.
Table of Contents:
Prerequisites
Before you begin, ensure you have met the following requirements:
- Java 17 or later (We'll be using Java 21 in the source code)
- Node.js and yarn or npm
- Docker
- Gradle
Tools and Resources
- Integrated Development Environment (IDE): For this blog post, you'll need to use an IDE like IntelliJ IDEA, Eclipse, or Visual Studio Code.
- Command-Line Interface (CLI): Basic familiarity with using the terminal or command prompt to run commands and scripts.
You can download the project template from the GitHub Repository to get started. This template comes with a realm JSON file preconfigured with Keycloak and RBAC.
To use the project template, follow these steps: navigate to the project's root directory and run the command 'docker compose up—d'. This will initiate the setup process.
By configuring our Spring Boot application as an OAuth2 Resource Server, we ensure that our backend APIs are secure and only accessible by authenticated and authorized users. In the next section, we will walk through the steps to configure our Spring Boot application as an OAuth2 Resource Server and integrate it with our React front-end.
Configure Keycloak
Creating the Realm:
- Login to Keycloak Admin Console: Access your Keycloak administration console using your admin credentials.
- Select "Master" Realm: From the top-left dropdown menu, ensure "Master" is selected as the current realm.
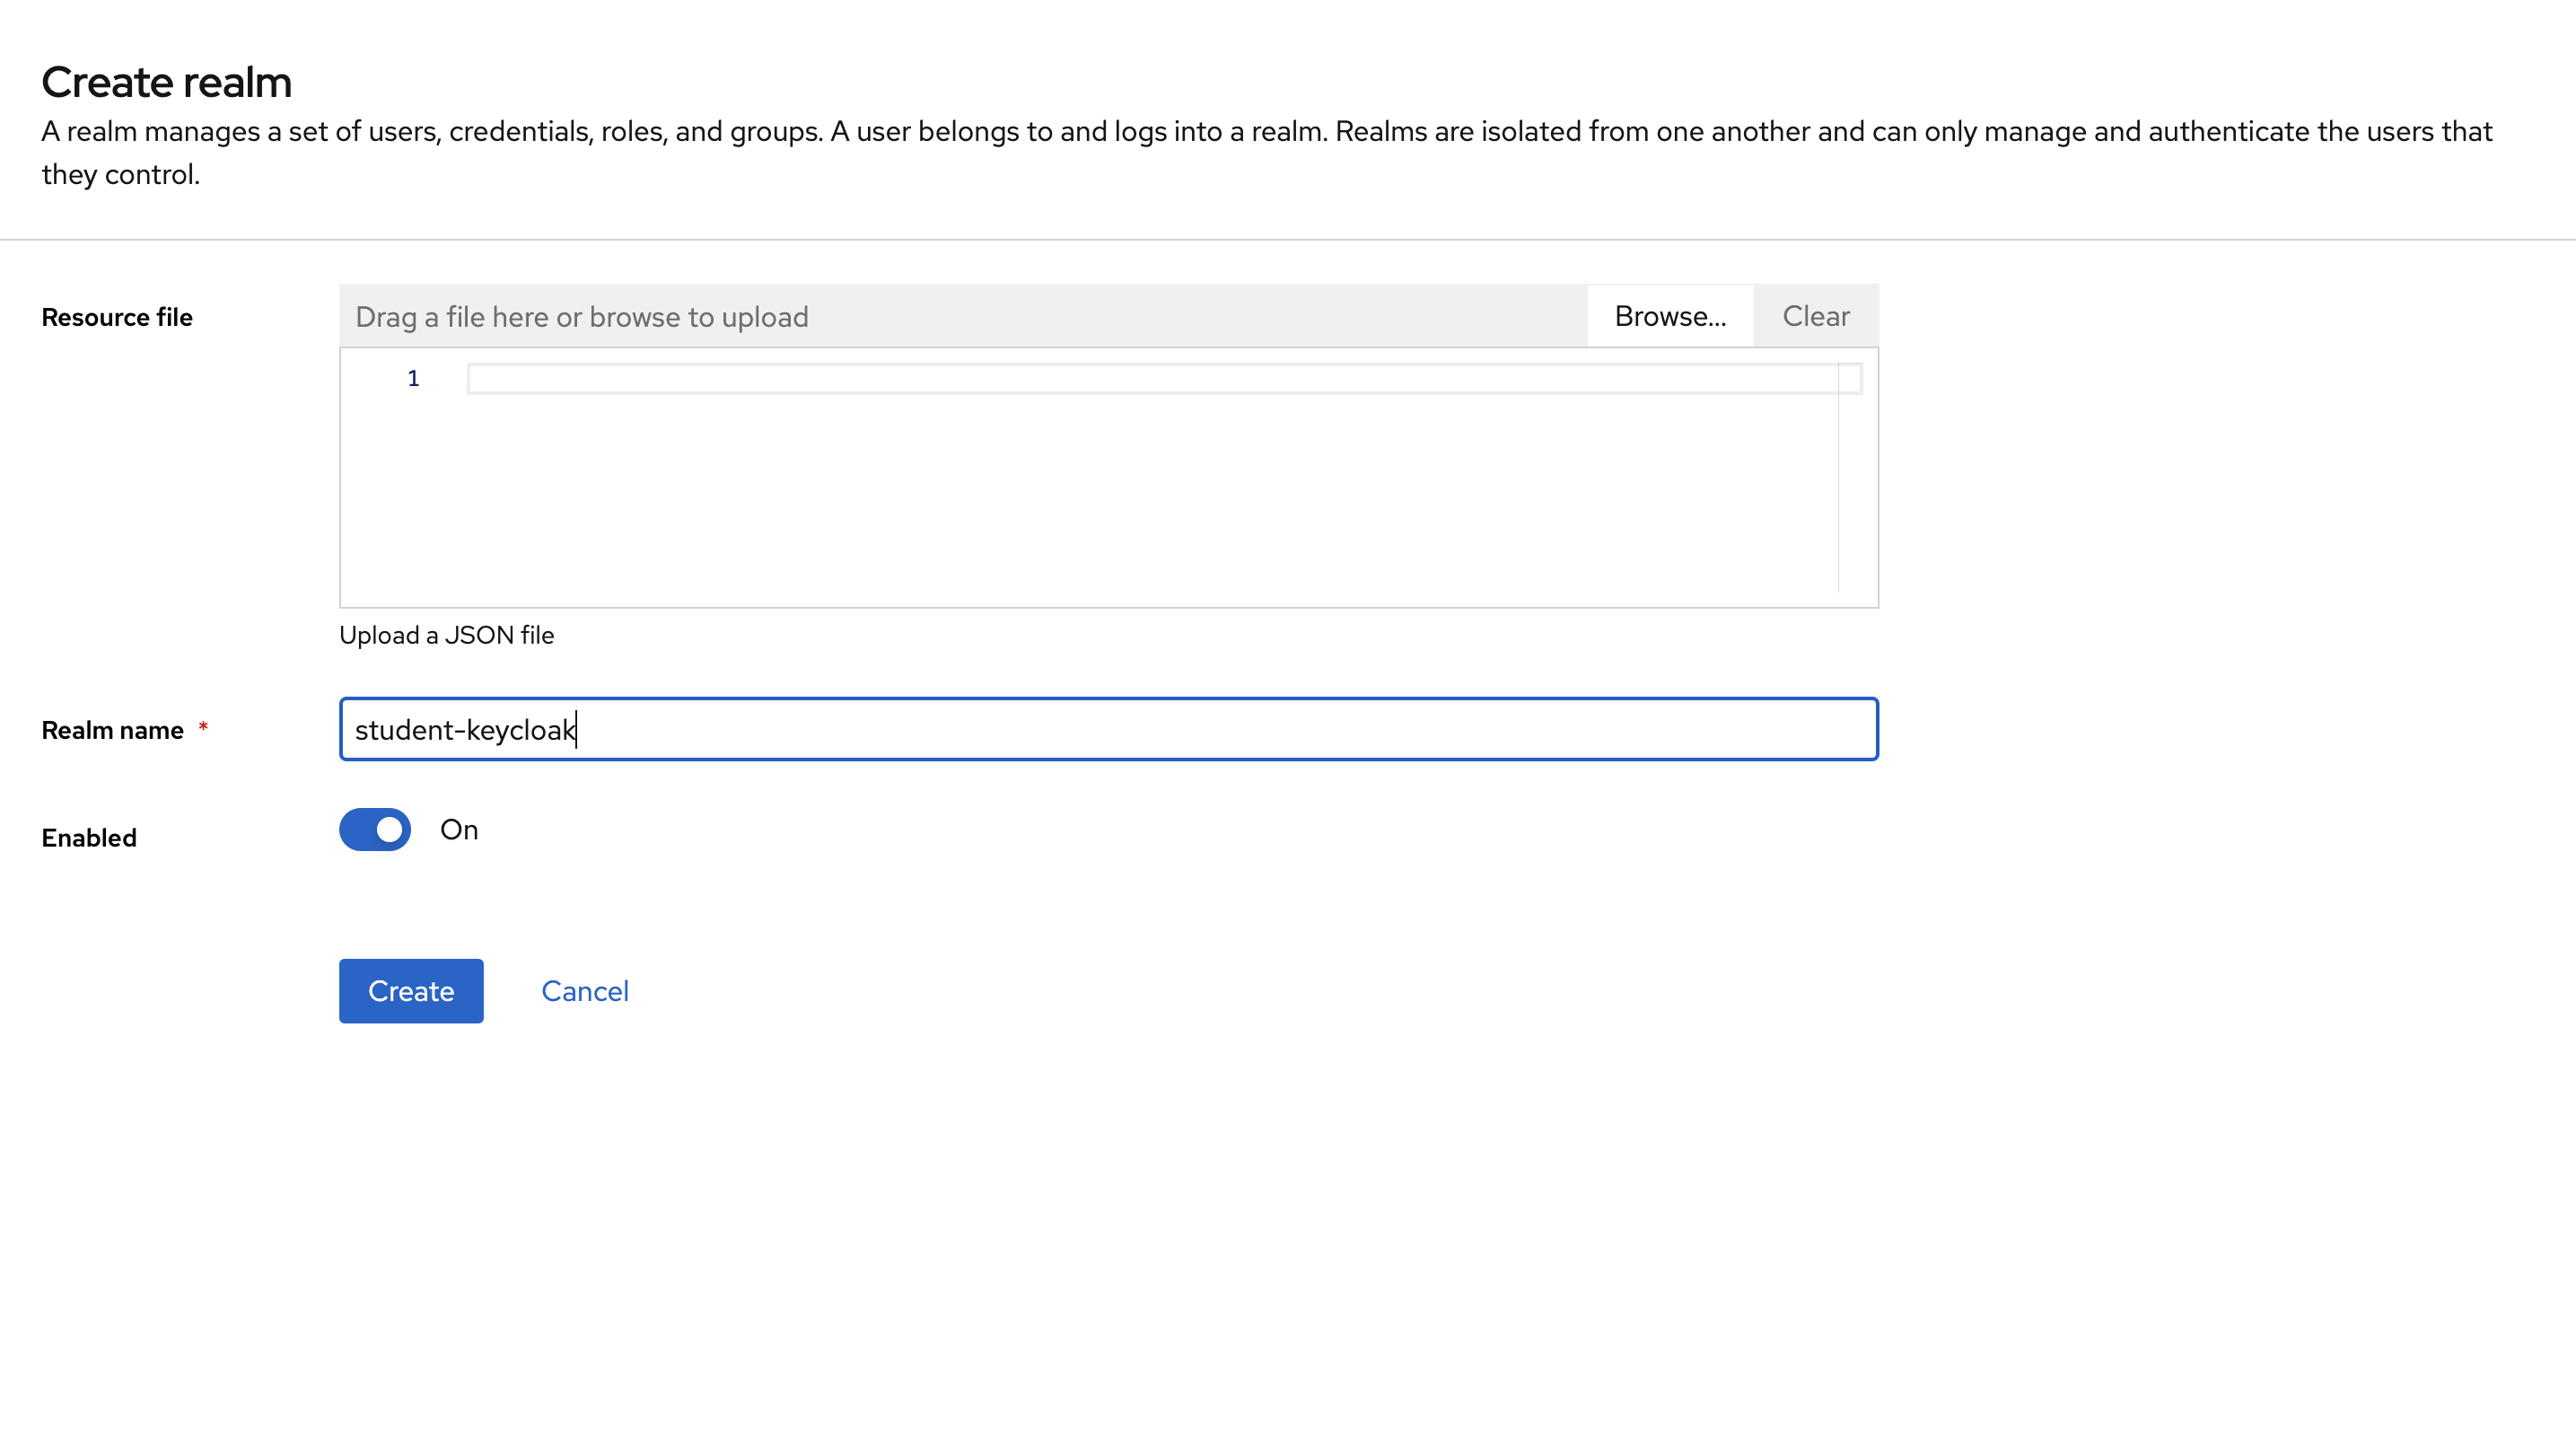
- Click "Create Realm": Click the "Create Realm" option in the same dropdown menu.
- Name the Realm: Enter a unique name for your new realm (e.g., "student-keycloak").
- Click Create realm. You'll switch to the realm automatically after creating it.
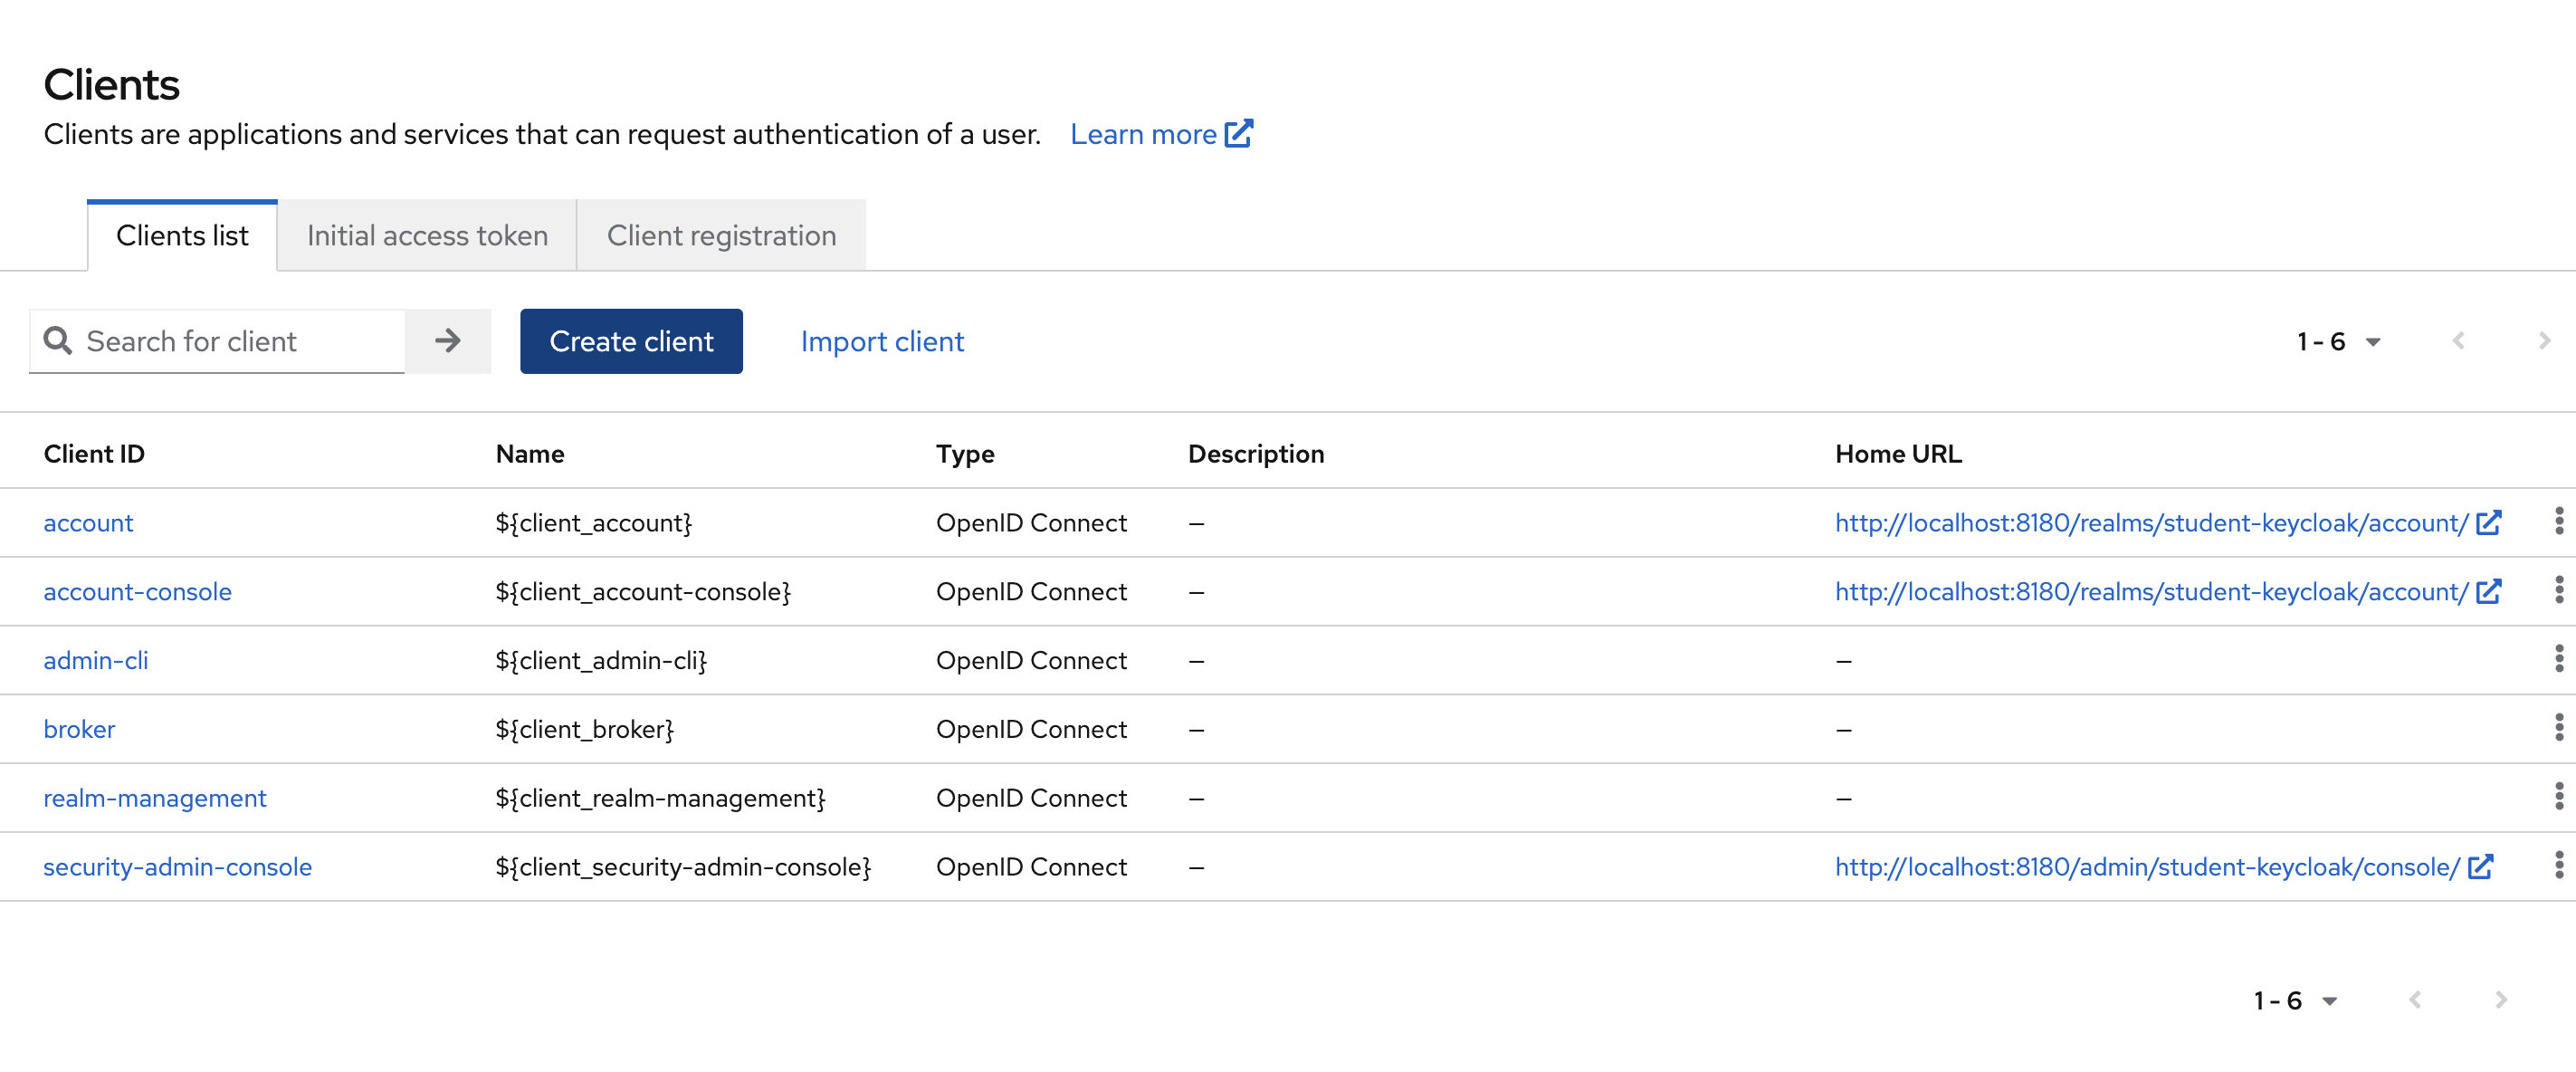
Continuing our configuration to support our authentication flow with Spring Boot's OAuth Resource Server, let's create a client.
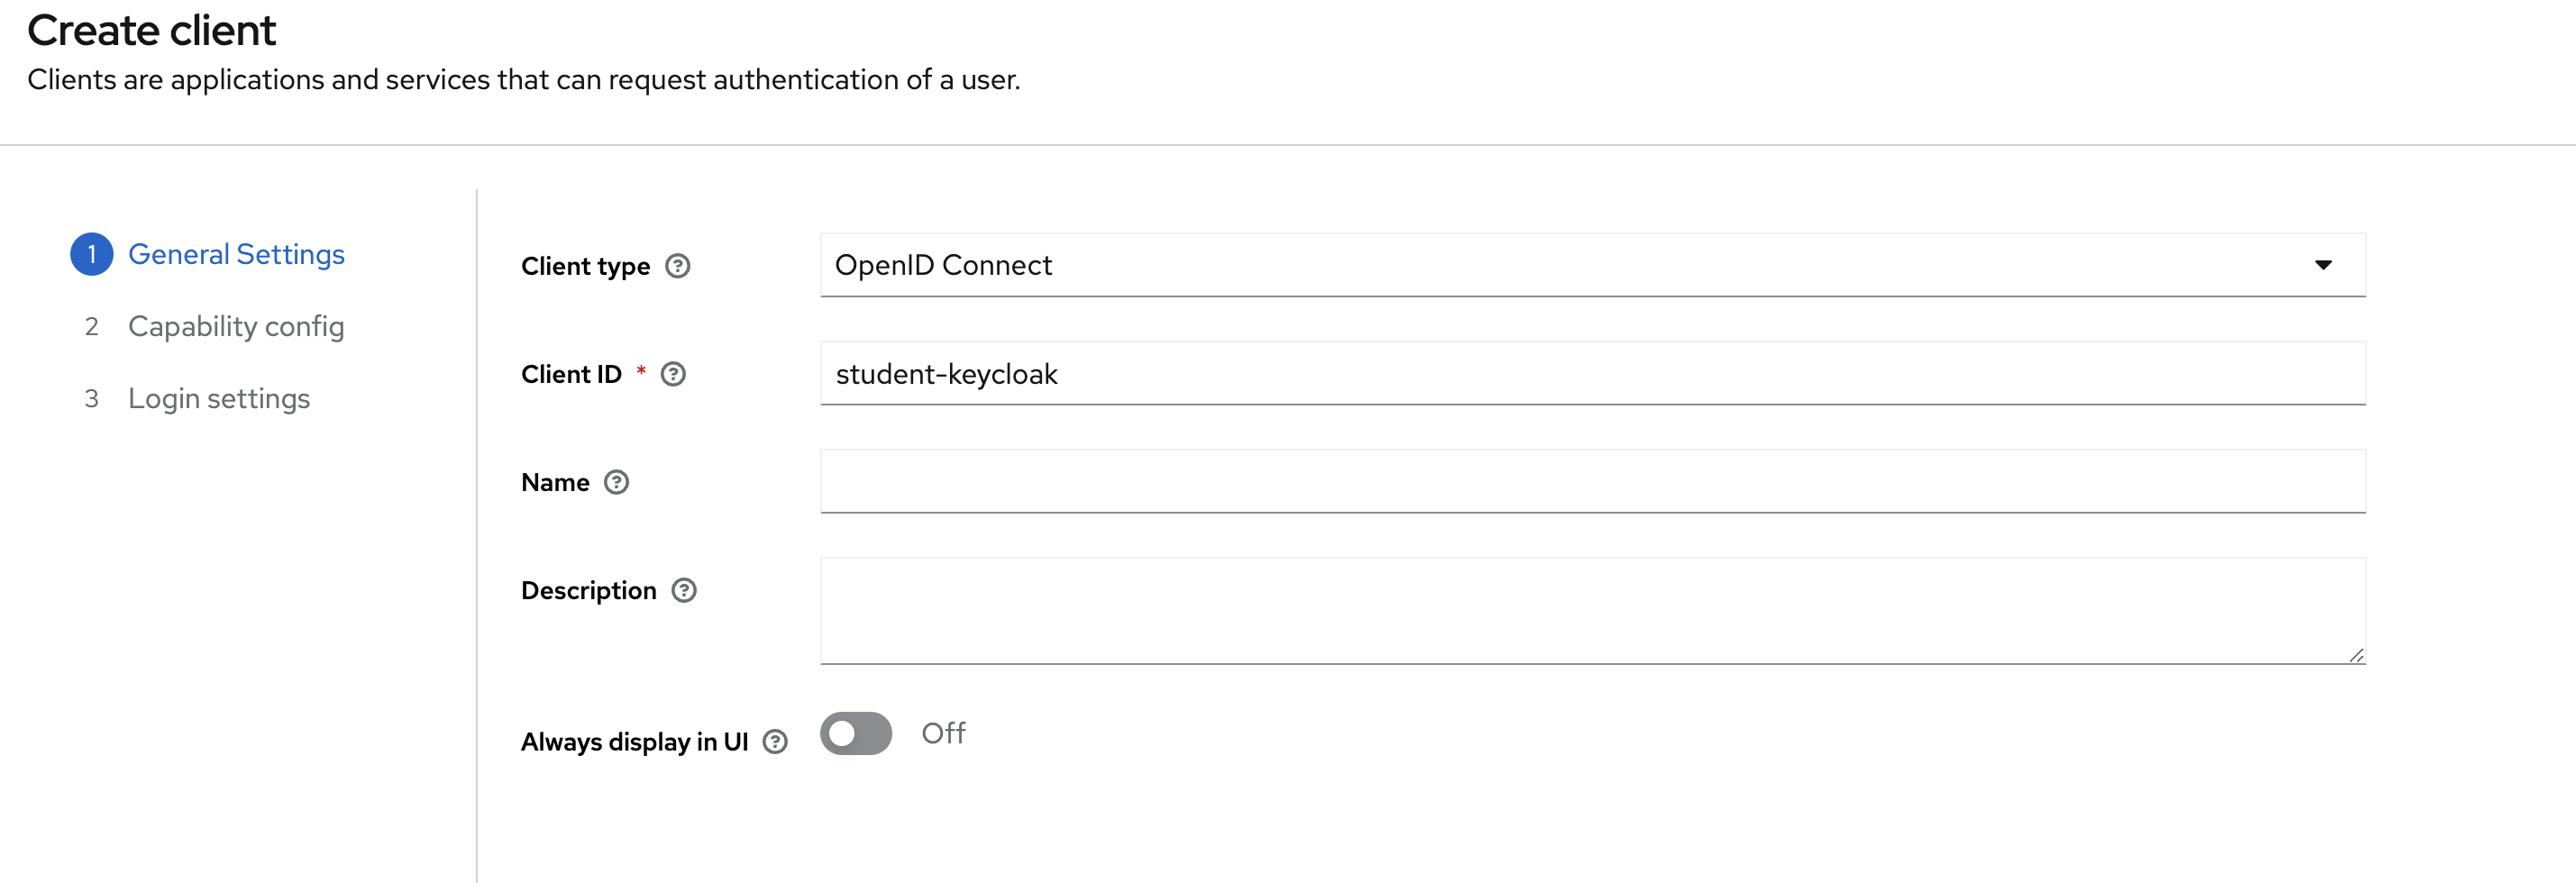
Enter student-keycloak as the client id, we'll need this later for our React applications config.
Set the Standard flow and deselect "Direct access grants," as we'll only need the standard flow.

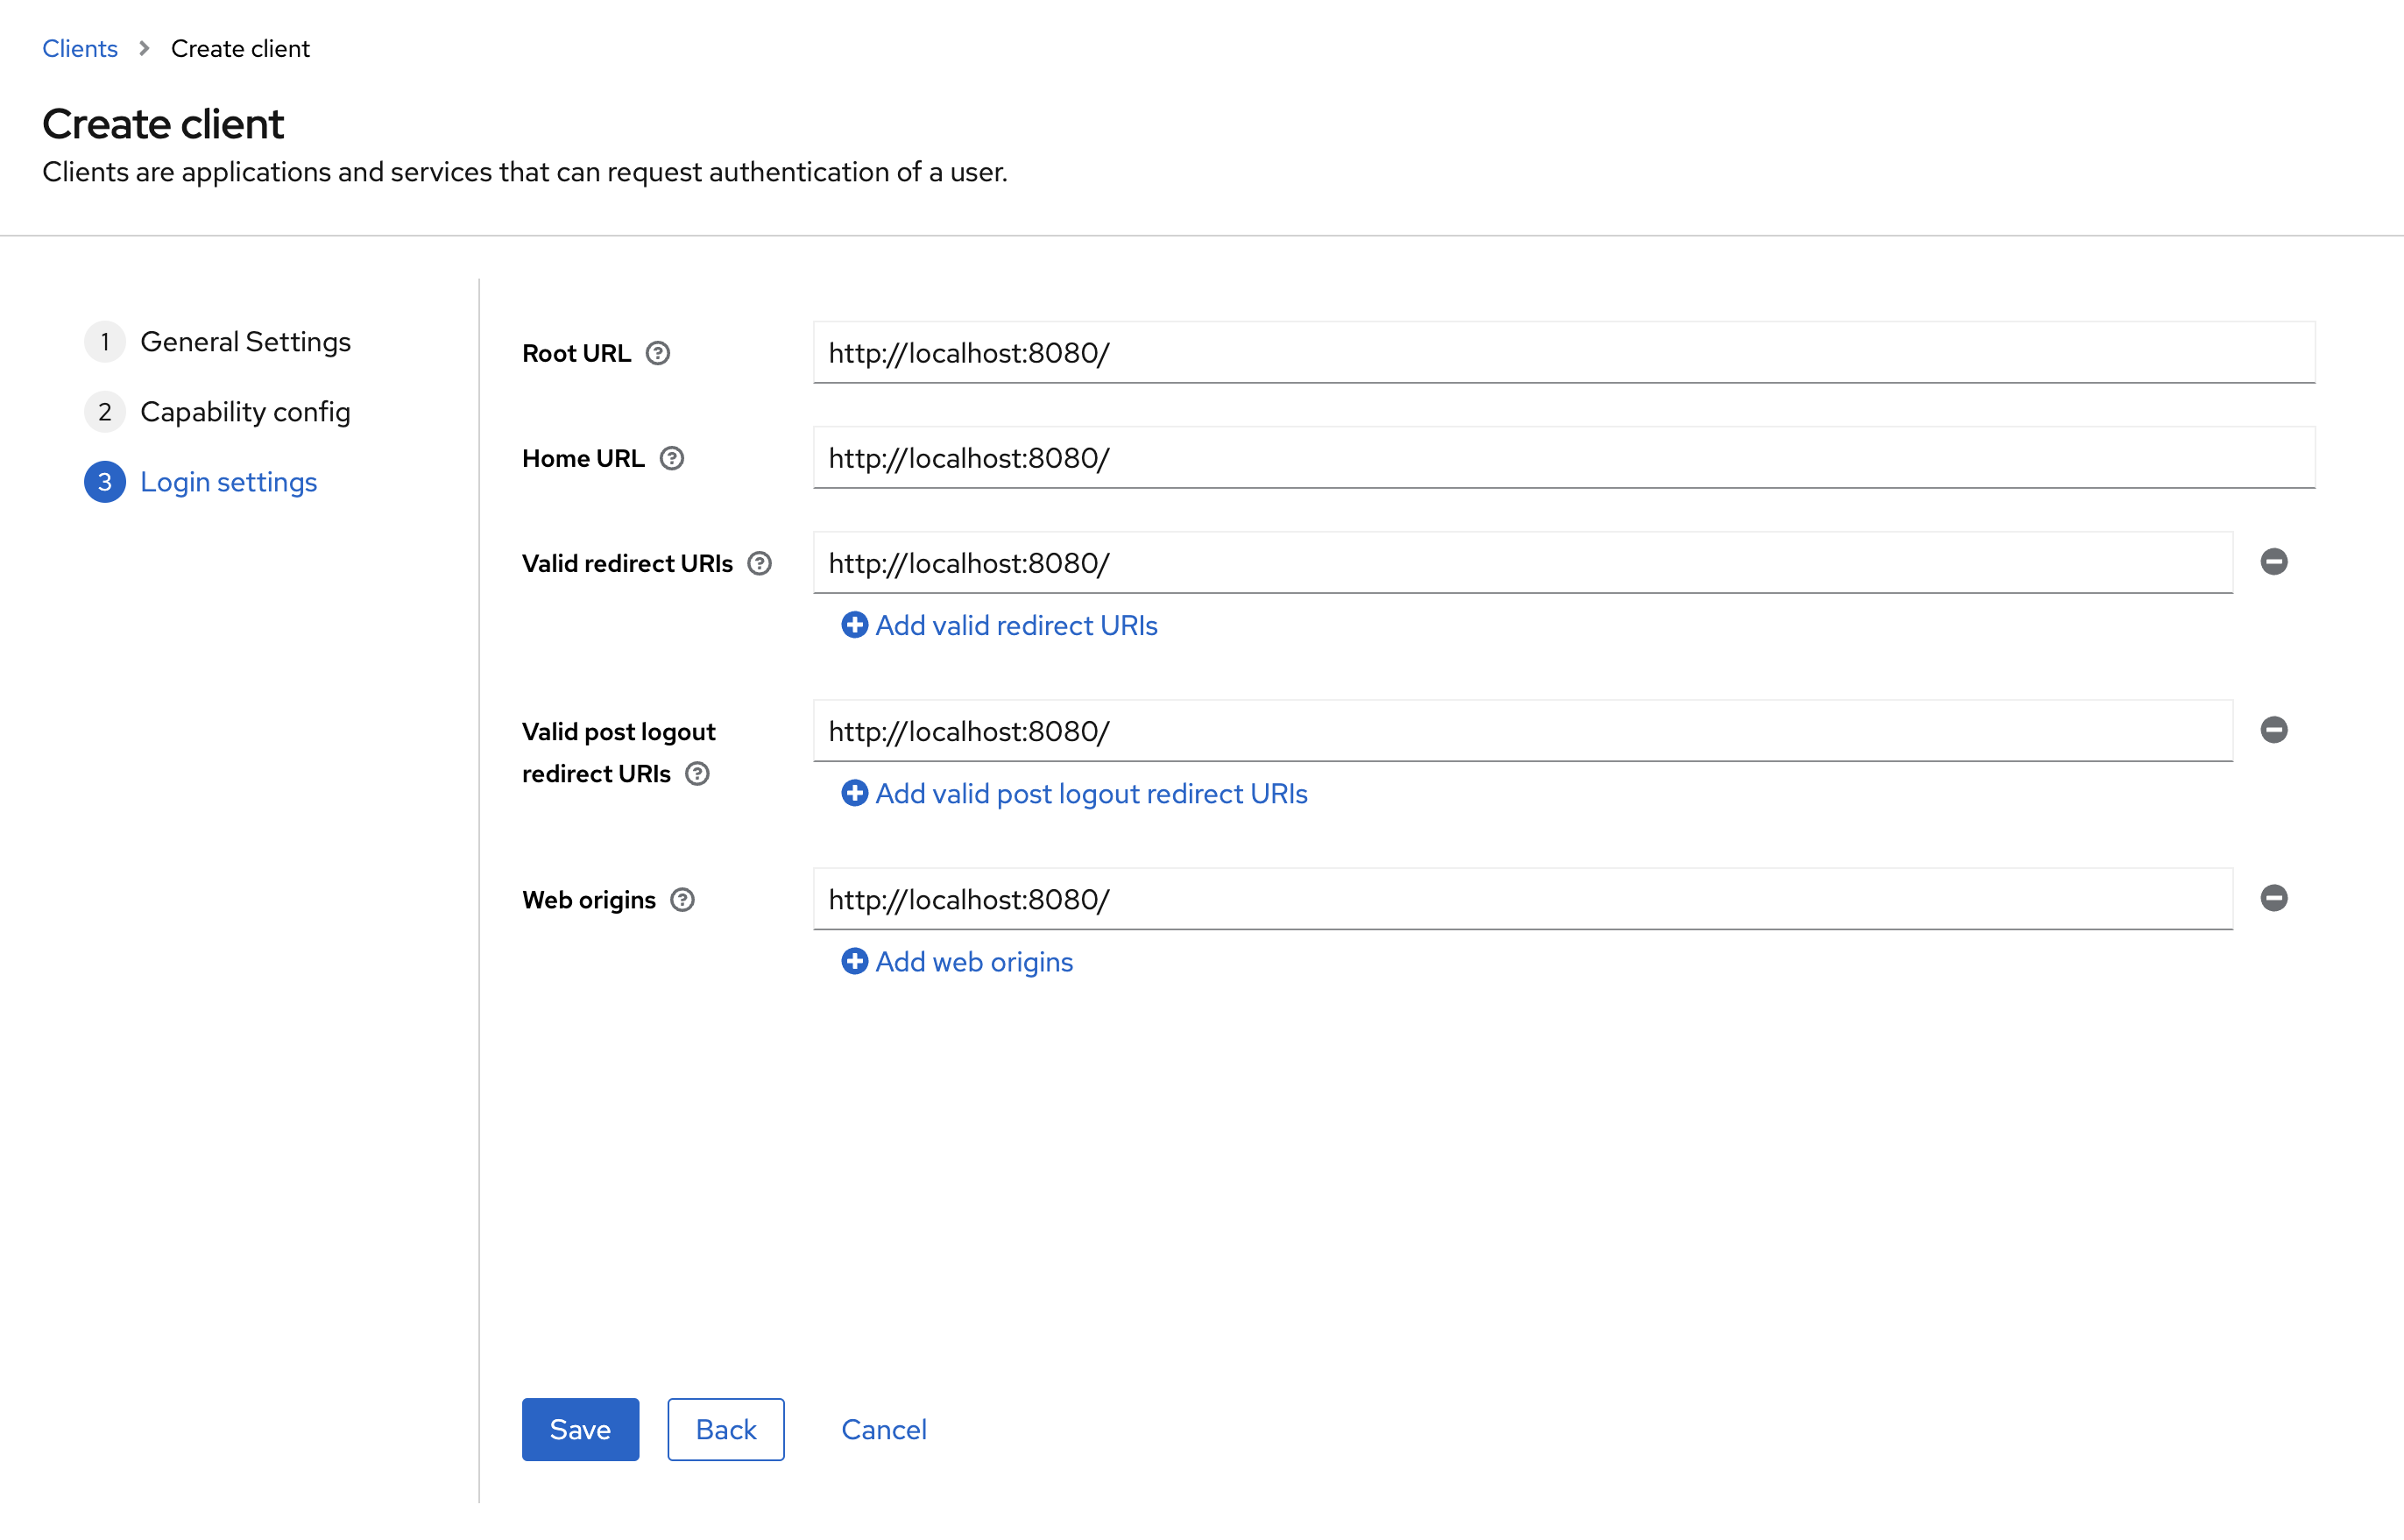
Setup your clients URLs, for localhost we'll be using Spring Boot's default 8080 port. Since we'll be serving React from the static resources directory, we can leave the ports on 8080.
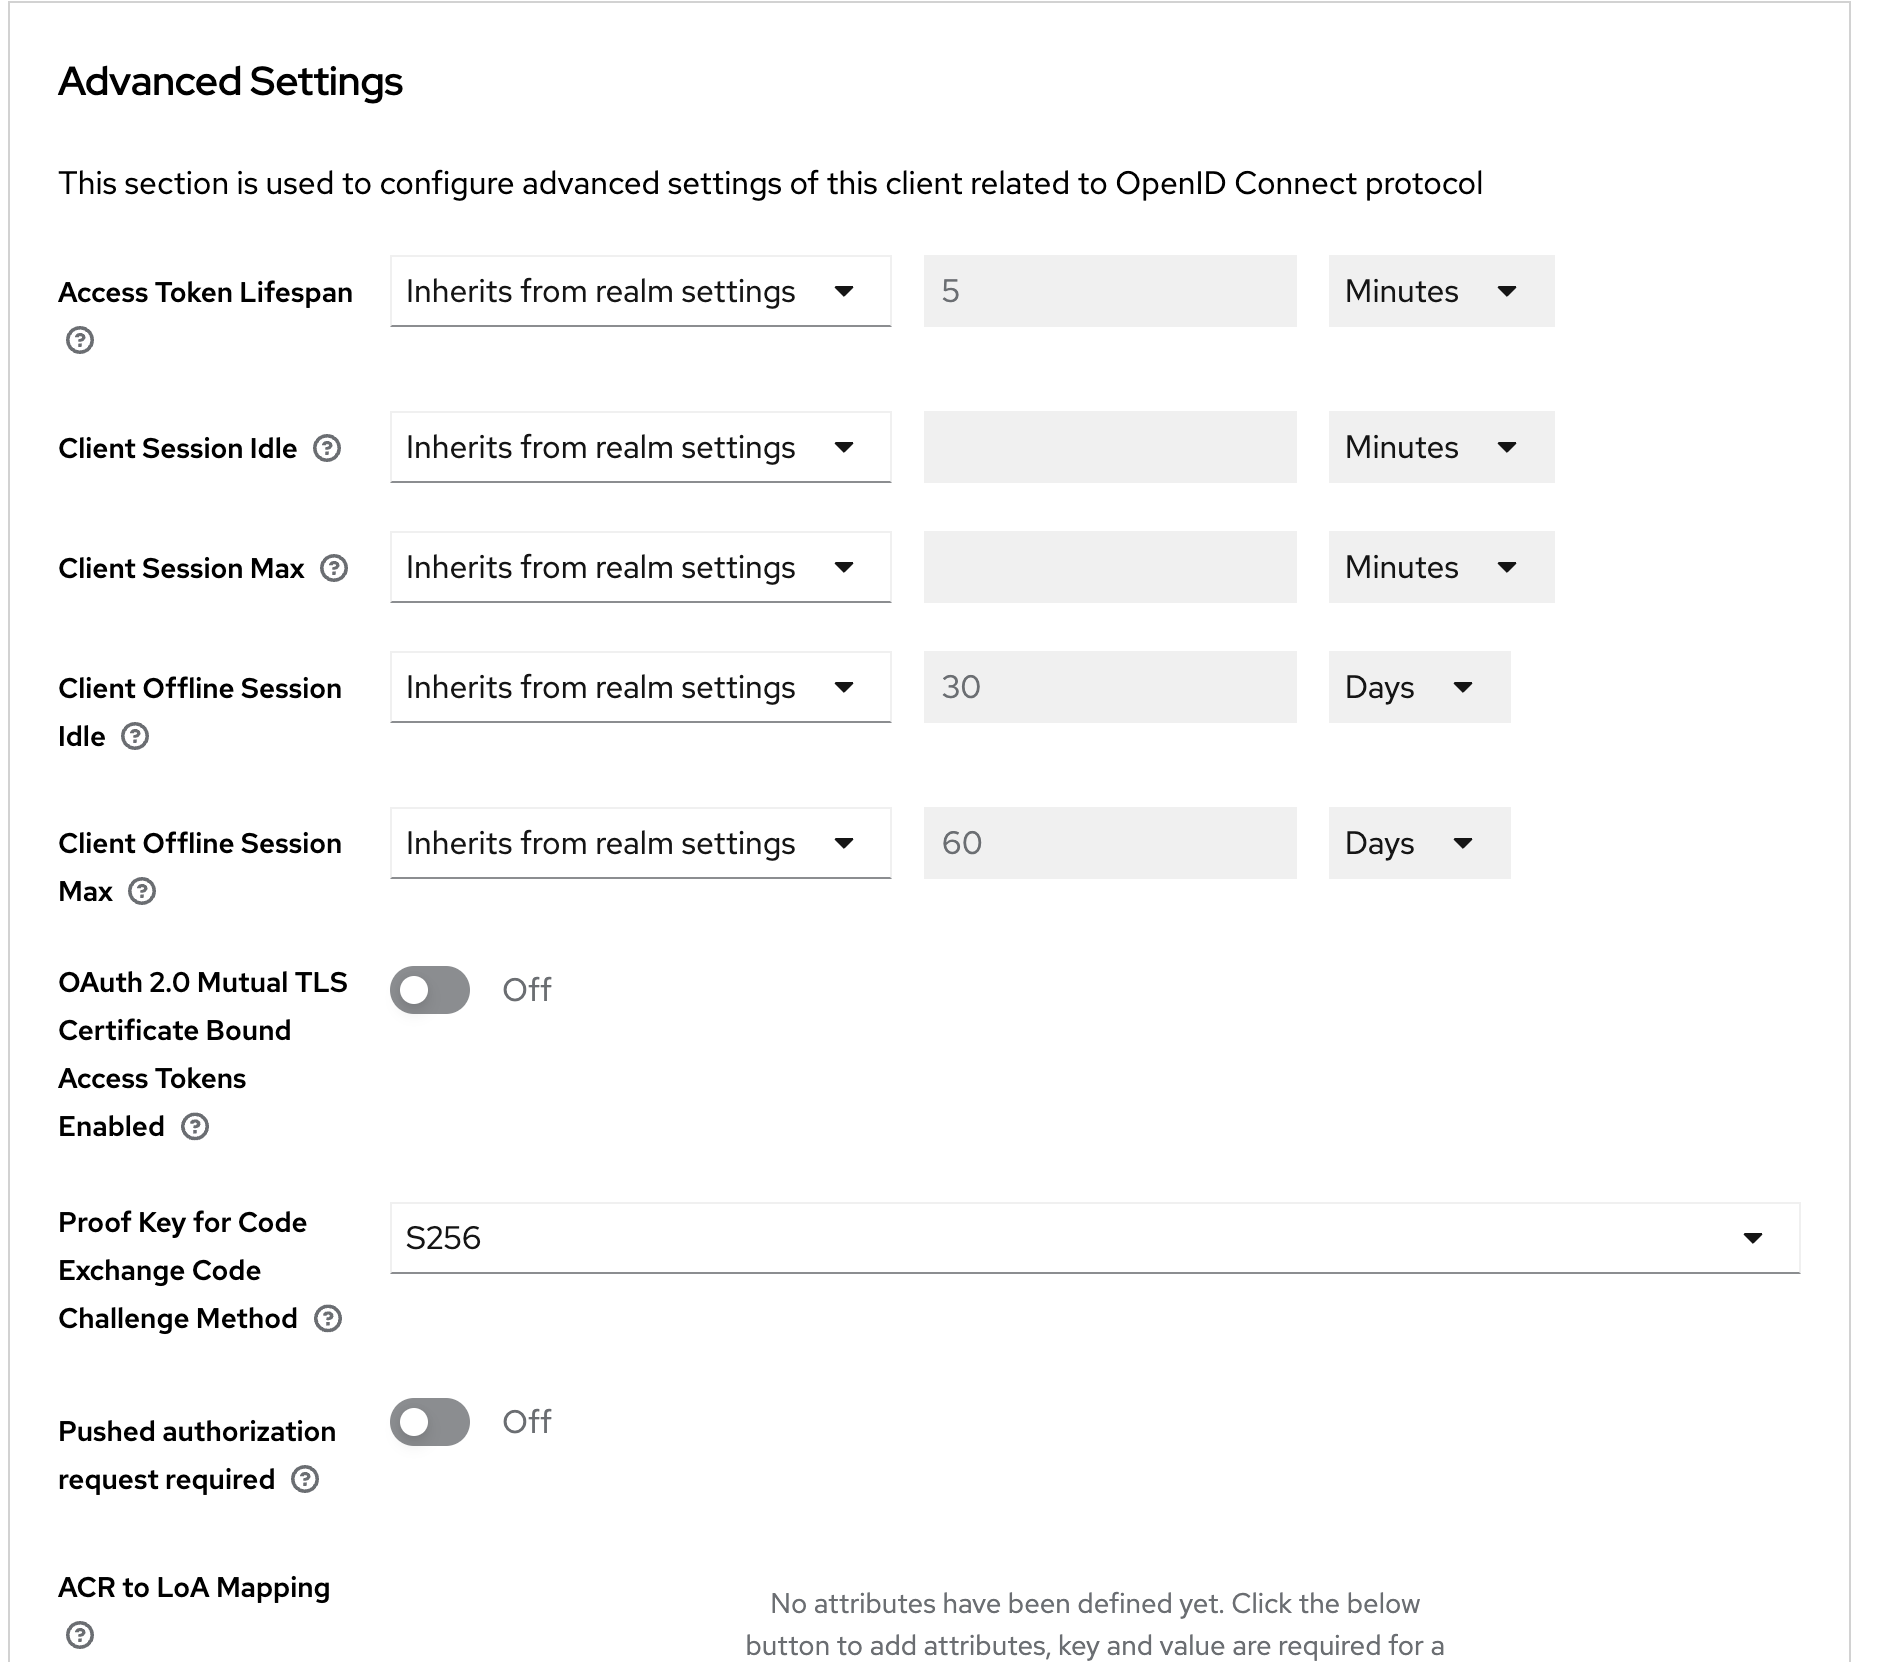
Click Advance and then scroll down to the Advance Settings and set the PKCE algorithm to S256

Set the Proof Key for Code Exchange Challenge method to S256.
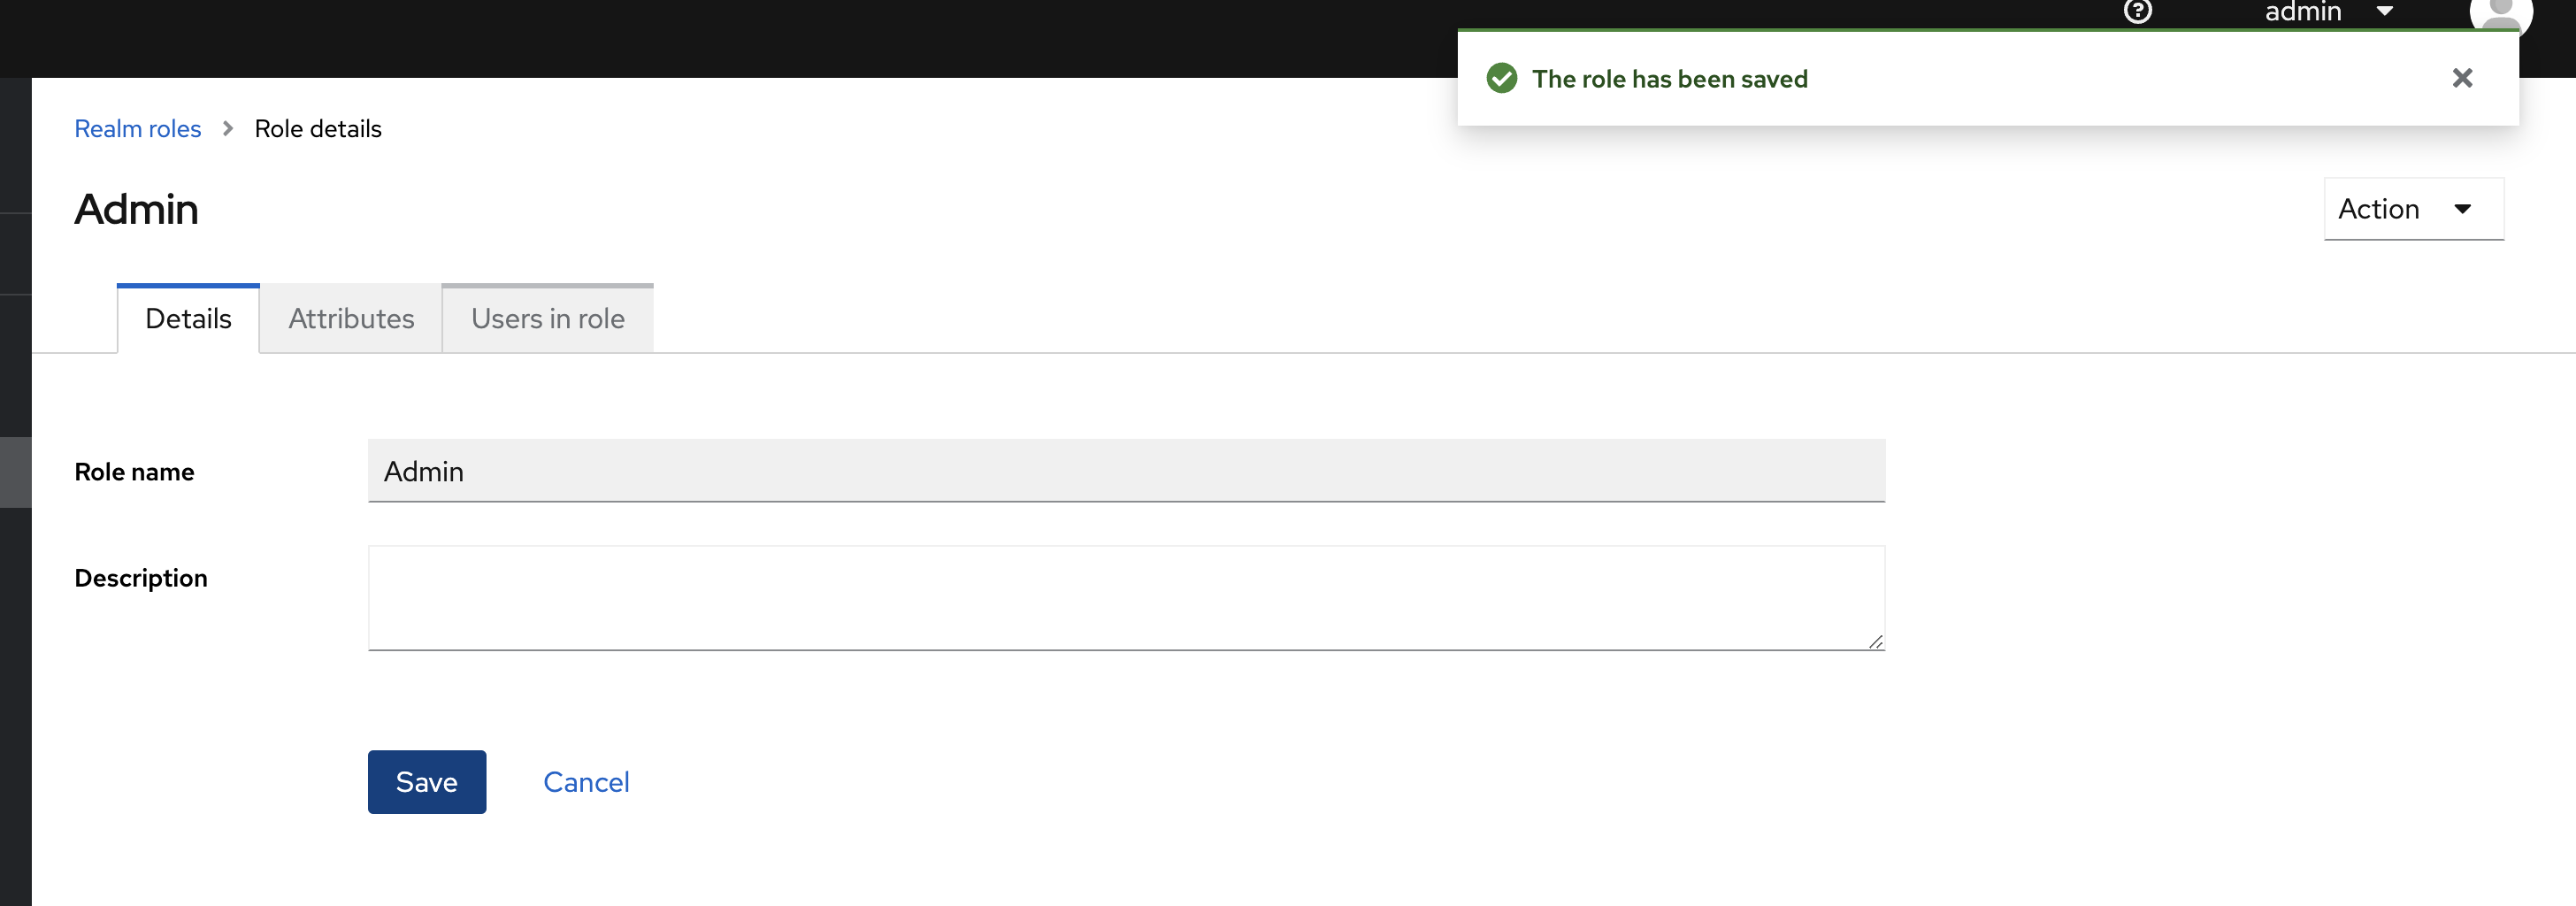
Create the roles for Keycloak to use with your Spring Boot app.

Create three roles "Super Admin", "Admin", "User" (note that by default Spring has an OIDC_USER)
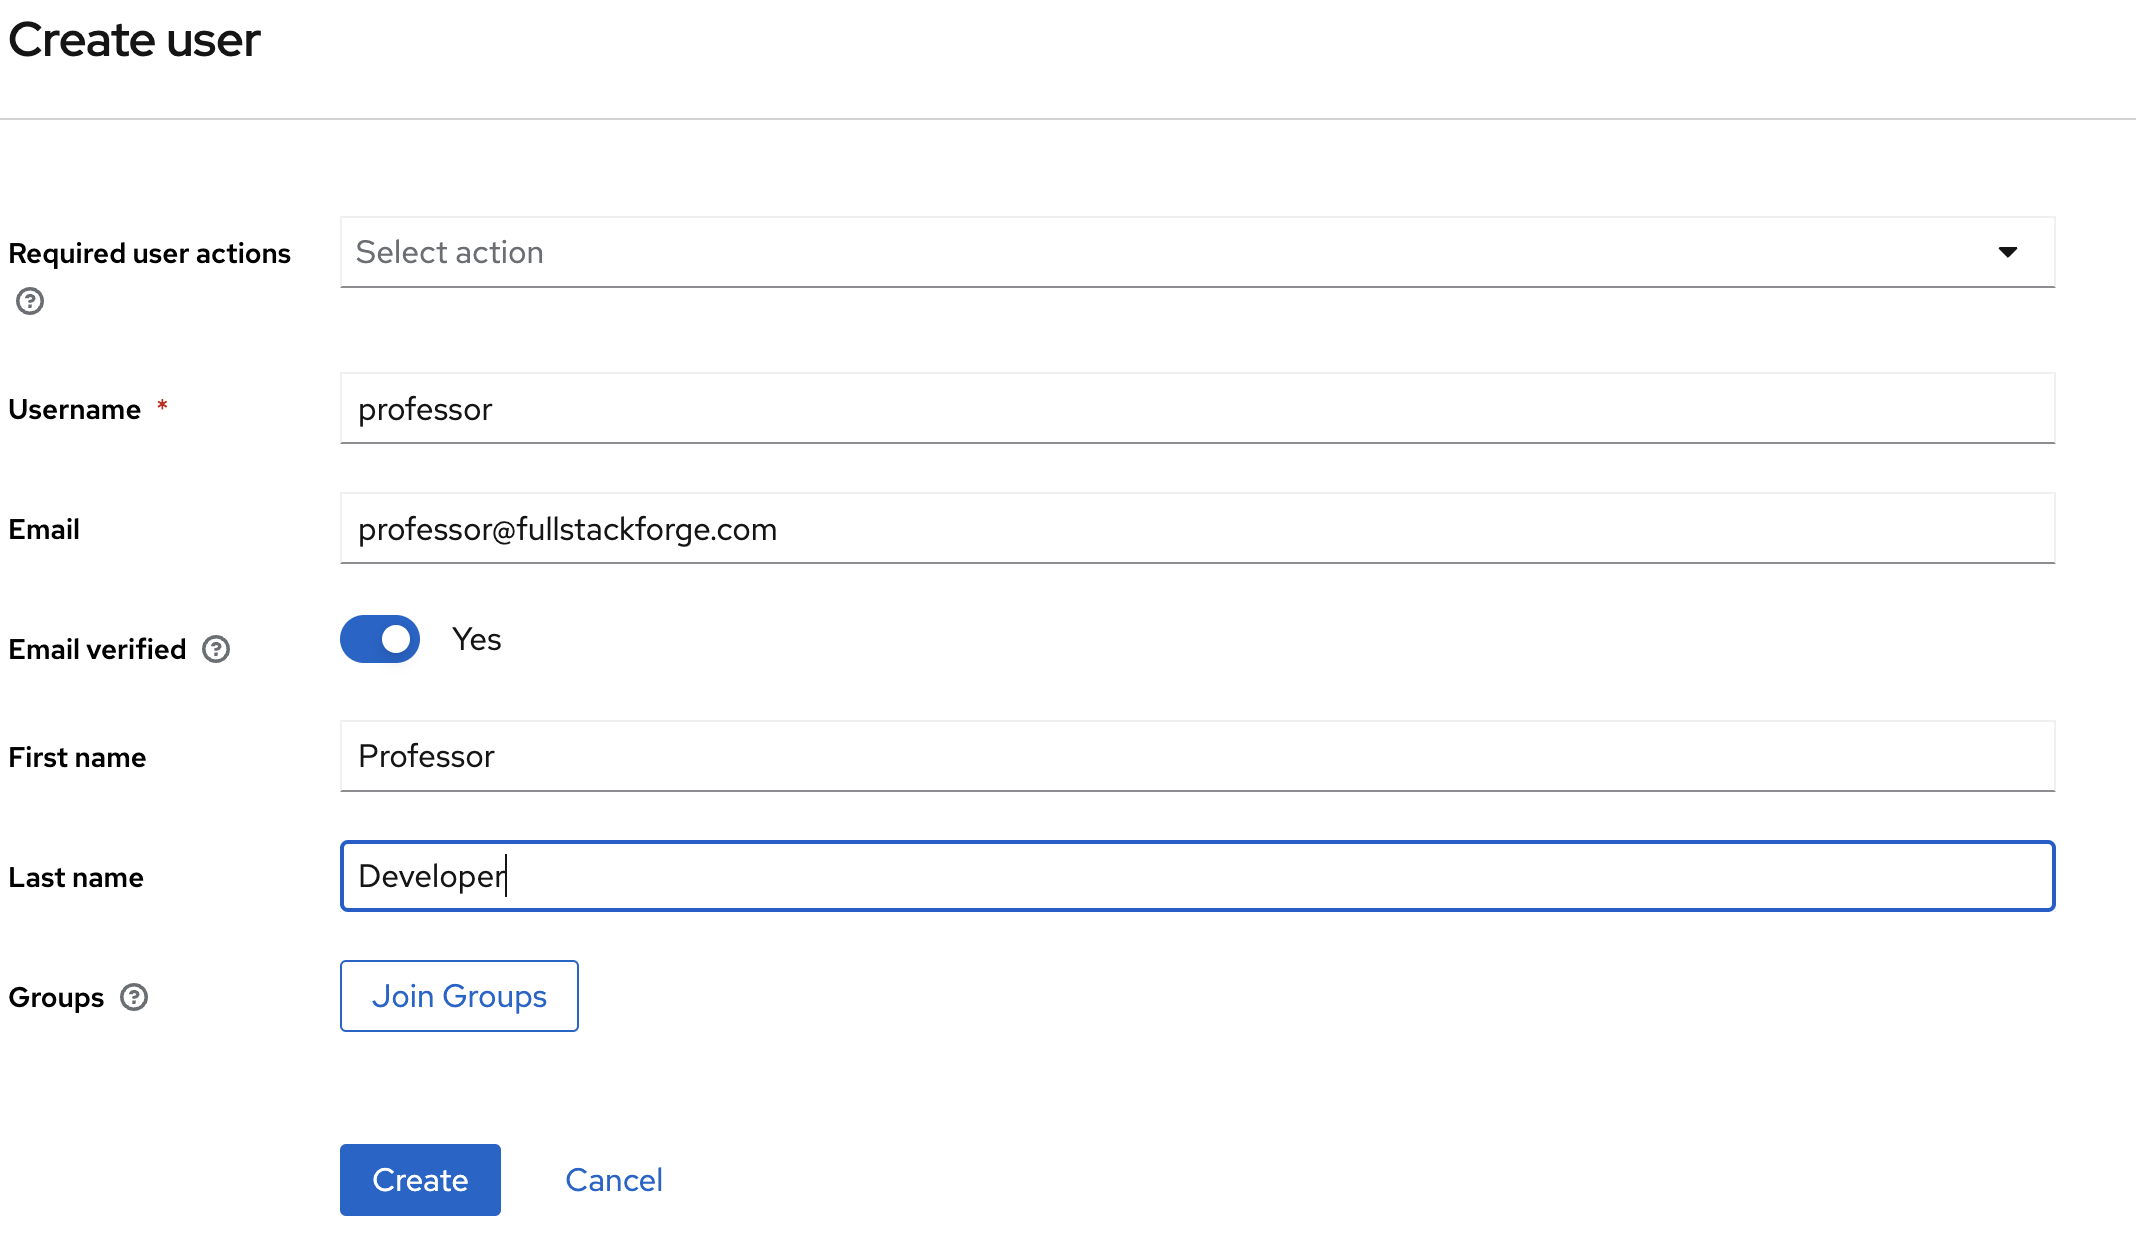
Add a user and assign them roles:

Make sure that the user's email is set to Email verified.
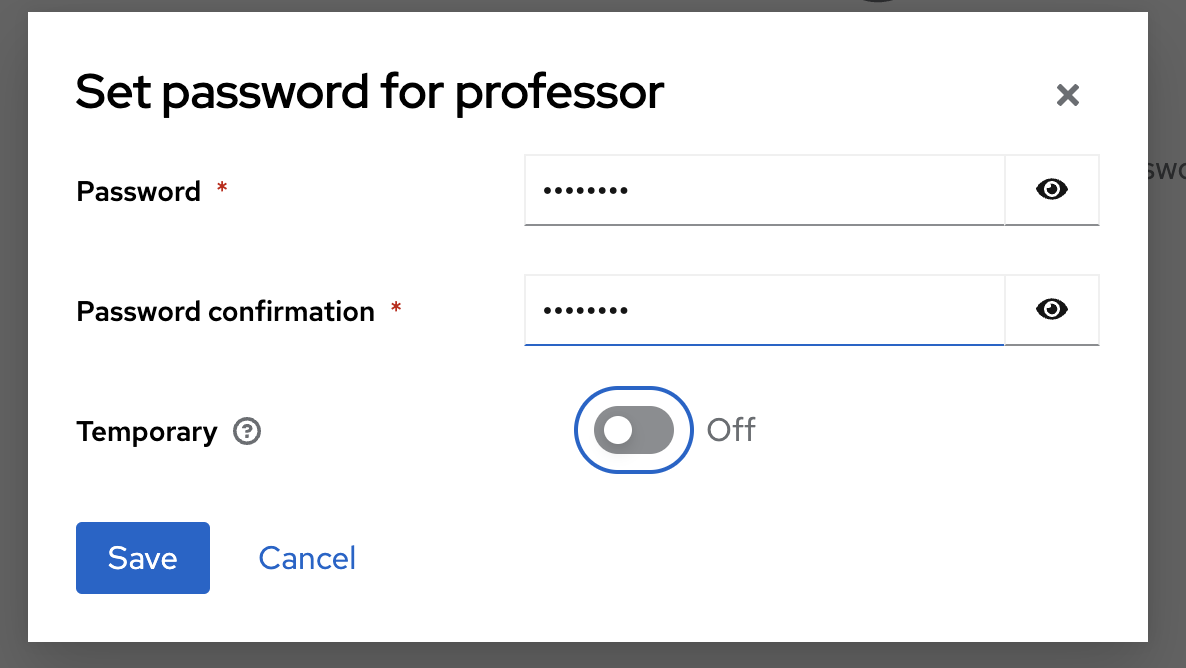
Set the credentials for the user and make sure Temporary is set to off.

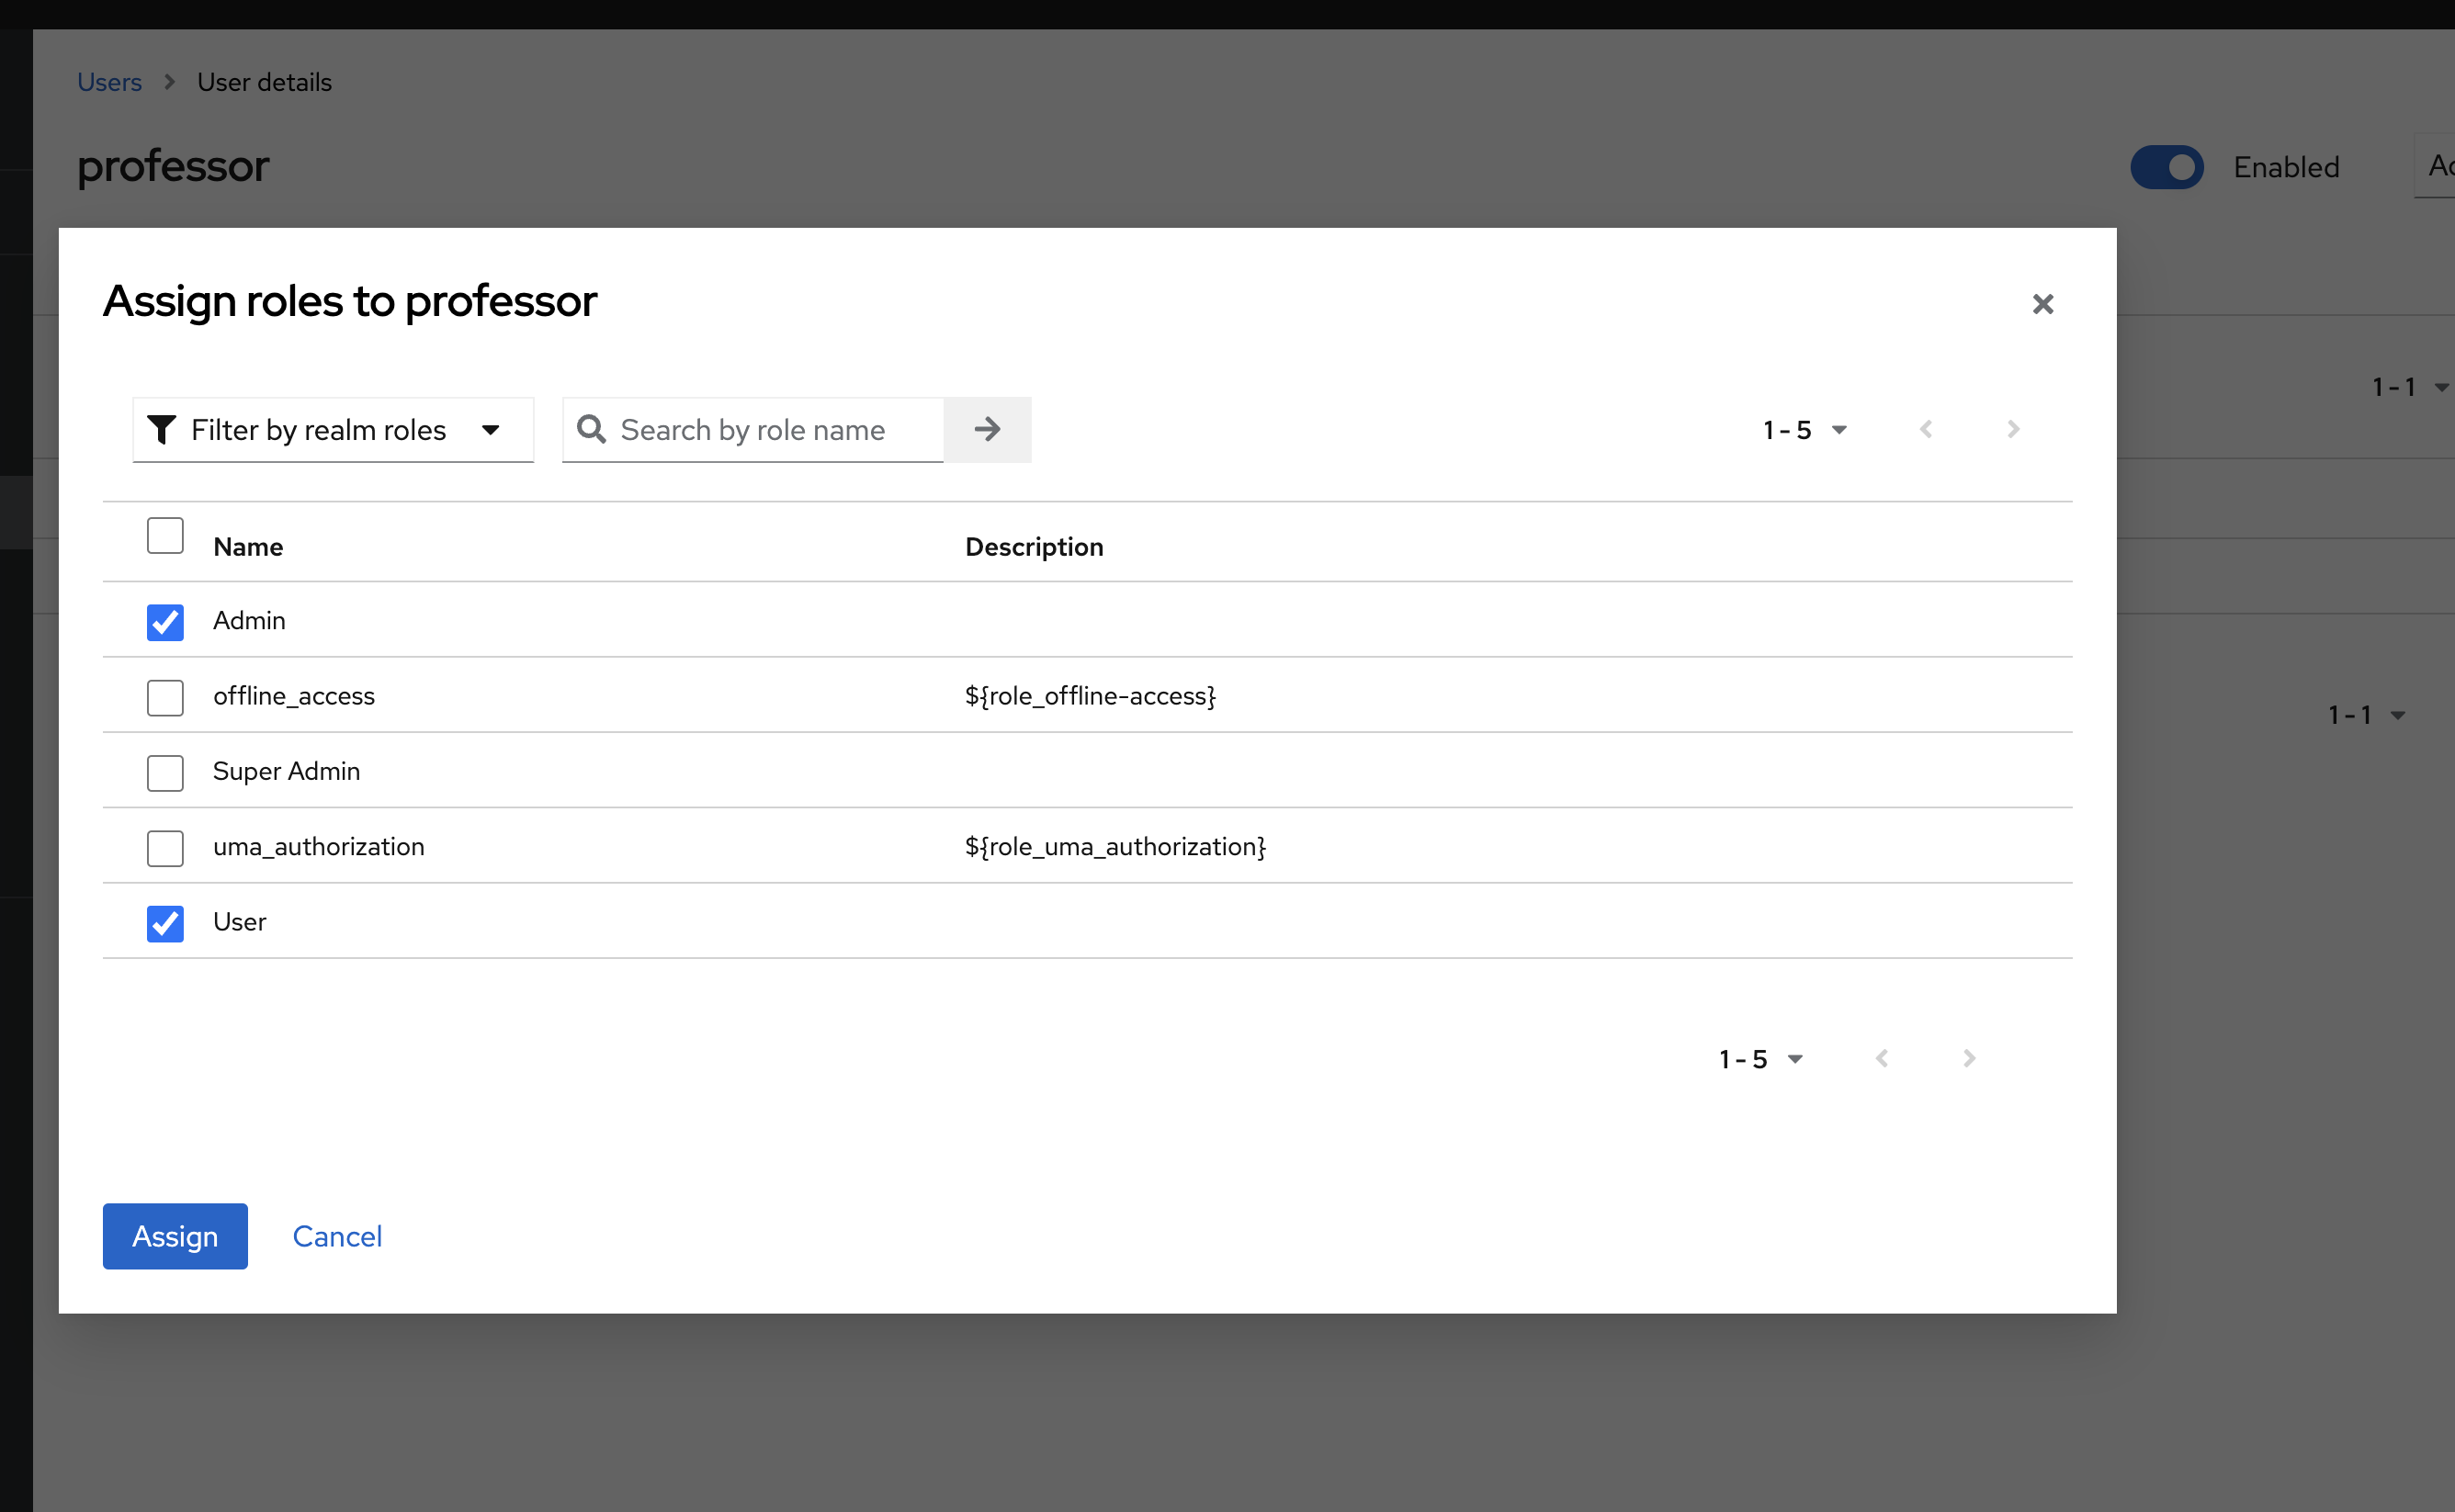
Assign the roles to your users. You can select multiple.
Project Setup
Step 1: Add Dependencies
First, we need to add the necessary dependencies to our Spring Boot project.
dependencies {
    implementation 'org.springframework.boot:spring-boot-starter-web'
    implementation 'org.springframework.boot:spring-boot-starter-data-jpa'
    implementation 'org.springframework.boot:spring-boot-starter-security'
    implementation 'org.springframework.boot:spring-boot-starter-oauth2-resource-server'
    implementation 'org.springframework.security:spring-security-oauth2-jose'

    implementation 'org.jetbrains:annotations:24.1.0'

    runtimeOnly 'org.postgresql:postgresql'
    compileOnly 'org.projectlombok:lombok'
    annotationProcessor 'org.projectlombok:lombok'
    testImplementation 'org.springframework.boot:spring-boot-starter-test'
    developmentOnly 'org.springframework.boot:spring-boot-docker-compose'
}
Step 2: Configure Application Properties
We need to configure the application to connect to Keycloak. Make sure your application.yaml or application.properties file has the following settings:
spring:
#Set docker lifecycle management to start_only
  docker:
    compose:
      lifecycle-management: start_only
#Configure Spring Security Resource Server
  security:
    oauth2:
      resourceserver:
        jwt:
          issuer-uri: http://localhost:8180/realms/student-keycloak
          jwk-set-uri: http://localhost:8180/realms/student-keycloak/protocol/openid-connect/certs
#Add logging for debugging
logging:
  level:
    org.springframework.security: DEBUG
    org.springframework.security.oauth2.client: DEBUG
    org.springframework.security.oauth2.server.resource: DEBUG
    org.springframework.web.client.RestTemplate: DEBUG
Debugging
The last few lines will let us see what is happening in our logs.
Spring Security uses RestTemplate to make request to Keycloak, so we'll be able to see those request in the logs.

Step 3: Create Security Configuration
- Enable CORS and CSRF protection within Spring Boot.
- Ensure the React build directory and its resources are accessible.
- Lockdown endpoints starting with "/api/" using .securityMatcher("/api/**")
.Other requests can be managed using other security configurations. - Use SessionCreationPolicy.STATELESS to prevent the server from storing session data. Each request must include a valid JWT token.
- Set up the OAuth 2 Resource Server.
- Implement a converter to extract Keycloak roles from JWT tokens for role-based authorization.
@Slf4j
@Configuration
@EnableWebSecurity
@RequiredArgsConstructor
@EnableMethodSecurity(securedEnabled = true, jsr250Enabled = true, proxyTargetClass = true)
public class DefaultSecurityConfig {

    @Bean
    protected SecurityFilterChain securityFilter( HttpSecurity http) throws Exception {
        return http
                .cors(Customizer.withDefaults())
                .csrf(Customizer.withDefaults())
                .authorizeHttpRequests(authorizeRequests ->
                        authorizeRequests
                                .requestMatchers(HttpMethod.GET, "/","/static/**",
                                              "/index.html","/assets/*","vite.svg")
                                .permitAll()
                                .anyRequest()
                                .authenticated()
                )
                .sessionManagement(s ->
                        s.sessionCreationPolicy(SessionCreationPolicy.STATELESS))
                .securityMatcher("/api/**")
                .oauth2ResourceServer(oauth2 -> oauth2
                        .jwt(jwt -> jwt
                        .jwtAuthenticationConverter(jwtAuthenticationConverter())))
                .build();
    }

    //We'll need to extract the roles from Keycloak
    @Bean
    public JwtAuthenticationConverter jwtAuthenticationConverter() {
        JwtAuthenticationConverter jwtConverter = new JwtAuthenticationConverter();
        jwtConverter.setJwtGrantedAuthoritiesConverter(jwt -> {
            Map realmAccess = jwt.getClaim("realm_access");
            List roles = (List) realmAccess.get("roles");
            return roles.stream()
                    .filter(Role::isValid)
                    .map(role -> new SimpleGrantedAuthority("ROLE_" + role.toUpperCase()))
                    .collect(Collectors.toSet());
        });
        return jwtConverter;
    }
}
Step 4: Configuring Static Resource Handling with WebMvcConfig
We need to configure Spring MVC to serve static resources (HTML, CSS, JavaScript), especially for a Single Page Application (SPA) like React. This involves customizing how static resources are resolved and handled.
@Configuration
public class WebMvcConfig implements WebMvcConfigurer {
    @Override
    public void addResourceHandlers( ResourceHandlerRegistry registry){
        registry.addResourceHandler("/**")
                .addResourceLocations("classpath:/static/dist")
                .resourceChain(true)
                .addResolver(new PathResourceResolver() {
                    @Override
                    protected Resource getResource(@NotNull String resourcePath,
                                       @NotNull Resource location) throws IOException
                                          {
                        Resource requestedResource = location.createRelative(resourcePath);
                        return requestedResource.isReadable() ? requestedResource
                                : new ClassPathResource("/static/index.html");
                    }
                });
    }
}
Step 5: Create a Role Enum
We'll use an enum to validate the role names that our application accepts.
public enum Role {
    USER, ADMIN, SUPER_ADMIN;

    public static boolean isValid(String role){
        try{
            Role.valueOf(role.toUpperCase());
            return true;
        } catch (IllegalArgumentException e) {
            return false;
        }
    }
}
Step 6: Create a RestController
We'll use it to verify the role-based accessed control we setup in Keycloak.
@RestController
@RequestMapping
public class StudentController {

    @RequestMapping("/api/super")
    @Secured("ROLE_SUPER_ADMIN")
    public String helloSuperAdmin() {
        return "Hello, Super Admin!";
    }

    @RequestMapping("/api/admin")
    @RolesAllowed("ROLE_ADMIN")
    public String hello() {
        return "Hello, Admin!";
    }

    @RequestMapping("/api/user")
    @PreAuthorize("hasRole('ROLE_USER')")
    public String helloUser() {
        return "Hello, User!";
    }

    @RequestMapping("/api/all")
    public String helloAll() {
        return "Hello, All!";
    }
}
Step 7: Configure React with OIDC Client
Install Vite with TypeScript in the root directory of your Spring Boot project.
Select Readt and TypeScript, or TypeScript + SWC (faster rust compiler)
yarn create vite frontend
Change the directory in your terminal to the frontend folder where you installed React and add the dependencies for the project.
yarn add @emotion/react@^11.11.4 @emotion/styled@^11.11.5 @fontsource/inter@^5.0.18 @fontsource/roboto@^5.0.13 @mui/icons-material@^5.15.15 @mui/joy@^5.0.0-beta.36 @mui/material@^5.15.15 @types/node@^20.12.12 @vitejs/plugin-react@^4.2.1 axios@^1.6.8 oidc-client-ts@^3.0.1 react@^18.2.0 react-dom@^18.2.0 react-oidc-context@^3.1.0
We'll use the <AuthProvider> from React-OIDC-Content and pass in our Keycloak configurations from earlier.
main.tsx:
const oidcConfig = {
    authority: "http://localhost:8180/realms/student-keycloak",
    client_id: "student-keycloak",
    redirect_uri: "http://localhost:8080/",
    response_type: "code",
    scope: "openid profile email",
    post_logout_redirect_uri: "http://localhost:8080/",
    filterProtocolClaims: true,
    loadUserInfo: true,
    onSigninCallback: onSignInCallback,
};

ReactDOM.createRoot(document.getElementById('root')!).render(
    <React.StrictMode>
        <AuthProvider {...oidcConfig}>
            <App/>
        </AuthProvider>
    </React.StrictMode>,
)
Now that we have configured our authentication provider.
We'll configure React to log in to Keycloak and send our code challenges for PKCE.
After successfully logging in to Keycloak, it will redirect us back to React with our JWT token.
We'll use Axios to send the JWT token to our OAuth resource server (Spring Boot), which will verify our JWT token is still valid, check the assigned roles, and allow or disallow us from accessing the endpoint.
App.tsx
export const fetchString = async (url: string, token: string | undefined, setString: {
    (value: SetStateAction): void;
}, label: string) => {
    try {
        const response = await axios.get(url, {
            headers: {
                Authorization: `Bearer ${token}`,
            },
        });
        setString(response.data);
    } catch (error) {
        console.error(`Error fetching ${label} hello world string:`, error);
    }
}

function MainApp() {
    const [adminHelloWorldString, setAdminHelloWorldString] = useState("");
    const [userHelloWorldString, setUserHelloWorldString] = useState("");
    const [superAdminHelloWorldString, setSuperAdminHelloWorldString] = useState("");
    const [allHelloWorldString, setAllHelloWorldString] = useState("");
    const auth = useAuth();

    useEffect(() => {
        if (auth.isAuthenticated) {
            const token = auth.user?.access_token;
            fetchString('http://localhost:8080/api/super', token, setSuperAdminHelloWorldString, 'super admin').then(r => console.log(r));
            fetchString('http://localhost:8080/api/admin', token, setAdminHelloWorldString, 'admin').then(r => console.log(r));
            fetchString('http://localhost:8080/api/user', token, setUserHelloWorldString, 'user').then(r => console.log(r));
            fetchString('http://localhost:8080/api/all', token, setAllHelloWorldString, 'all').then(r => console.log(r));
        }
    }, [auth.isAuthenticated, auth.user?.access_token]);

    const logout = () => {
        auth.removeUser().then(r => console.log(r));
        window.location.reload();
    }
    return (
      <CssVarsProvider disableTransitionOnChange>
      <CssBaseline />
      <Stack
       sx={{
        backgroundColor: "#000",
        minHeight: '100dvh',
        minWidth: '100vw',
        justifyContent: "center",
        alignItems: "center",
        gap: 2,
     }}>
     <Button onClick={() => auth.signinRedirect()} color="primary">
          Log in
     </Button>
     <>
     <Typography textColor="#FFF">
           Hello {auth.user?.profile.email}
     </Typography>
     <Typography textColor="#FFF">
           {allHelloWorldString ? allHelloWorldString : "...not authenticated" }
     </Typography>
     <Typography textColor="#FFF">
  {superAdminHelloWorldString ? superAdminHelloWorldString : "...unable to access Super Admin" }
     </Typography>
     <Typography textColor="#FFF">
           {adminHelloWorldString ? adminHelloWorldString : "...unable to access Admin" }
     </Typography>
     <Typography textColor="#FFF">
           {userHelloWorldString}
     </Typography>
          {auth.isAuthenticated &&
     <Button onClick={() => void logout()}>
         Log out
     </Button> }
     </>
    </Stack>
    </CssVarsProvider>
    );
}

export default function App() {
    return (
            <MainApp />
    );
}
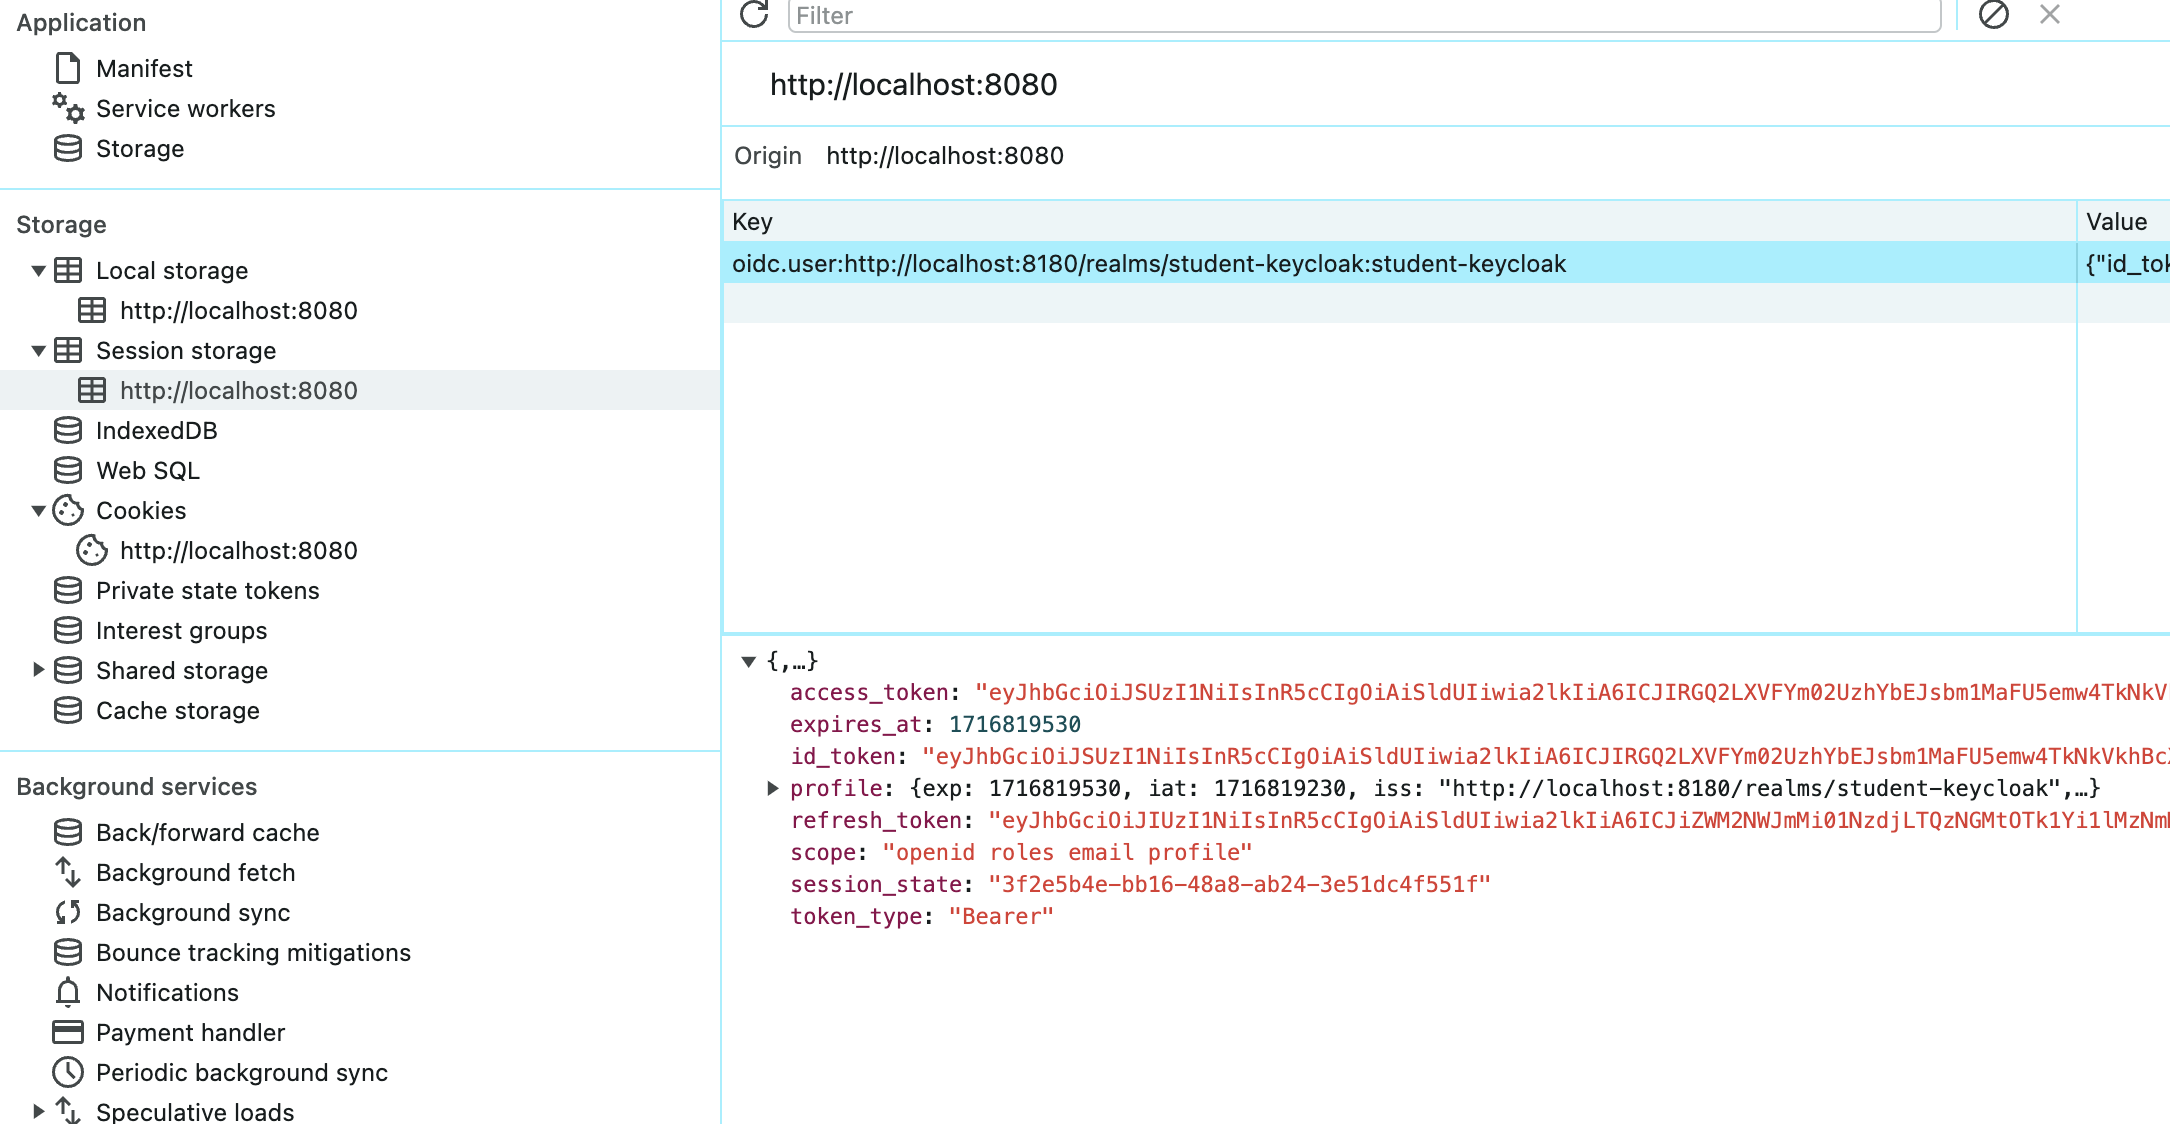
Session Storage
React-OIDC-Client, by default, stores the user session cookie, which contains the JWT, inside the session storage.
Conclusion
That's it, and by following this guide, you'll secure your full-stack application with React and Spring Boot, using Keycloak and OAuth2 to manage authentication and authorization, ensuring only authorized users can access your resources.


